
How to set up LobbyGod on Windows 11
The Easy Way:
Step 1:
On your PC visit yogadns.com and download the latest version.
You DO NOT need to pay for this software - It comes included with 30 days of the "Pro" version when you first install. However the "Pro" version it is not required in any way. The basic free version has everything we need already.

Step 2:
Download the LobbyGod YogaDNS configuration file from our link here.
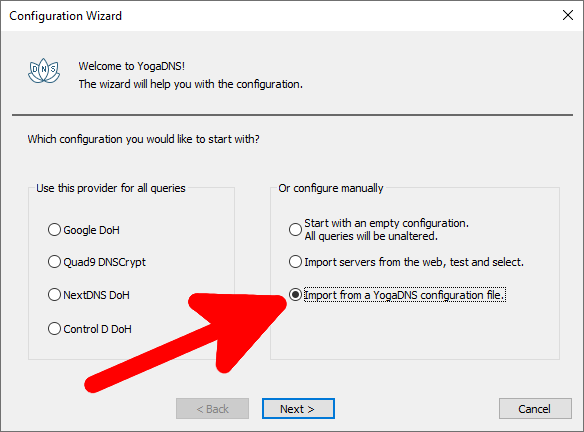
Step 3:
Install Yoga DNS and launch it. On the first-time set-up screen select the last option "Import from a YogaDNS configuration file" and select the LobbyGod config file we just downloaded in the previous step.
If you do not see the screen in the image below. Simply select Configuration -> Configuration Wizard at the top of YogaDNS window to continue.
After importing, restart your PC, re-launch YogaDNS if it hasn't launched automatically and continue to the next step.
Step 4:
Visit the LobbyGod dashboard at be.lobbygod.com and login to your account then pick a country from the list. IMPORTANT - Make sure the device you are visiting the dashboard from (for example your phone) is connected to the same network as your PC.
Step 5:
Launch the game and confirm that your in-game location changed. You can learn how using our quick guide.
That's it! If your location has changed in-game you are all set. If your in-game location does not change please get in touch with us on Discord or by emailing help@lobbygod.com
It is important that YogaDNS is running for LobbyGod to take effect. If it is not running, LobbyGod will not work. To disable LobbyGod simple quit the YogaDNS app from the system tray.
The Advanced Way
Click the START" button then click "Settings"

Click on "Network and Internet" then click on "Wi-Fi or Ethernet" depending on what type of Internet you are using

Select your network name and click on "Edit" in the DNS service assignment tab

Under Edit network DNS settings, click on "Manual and "Save"

Turn on IPV4, make sure IPv6 is disabled and fill in the Primary DNS and Secondary DNS with the following and click Save.
- Primary DNS: 15.197.238.60
- Secondary DNS: 3.33.242.199
IMPORTANT: Restart your PC after setting up for the first time. This is done to flush your PC's DNS cache.

Final step:
Visit the LobbyGod dashboard at be.lobbygod.com and login to your account then pick a country from the list. IMPORTANT - Make sure the device you are visiting the dashboard from (for example your phone) is connected to the same network as your PC.
Launch the game and confirm that your in-game location changed. You can learn how using our quick guide.
That's it! If your location has changed in-game you are all set. If your in-game location does not change please get in touch with us on Discord or by emailing help@lobbygod.com